Your great-grandparents probably made their stock from bones (also known as bone broth) on a regular basis, and now it’s become one of the most trendy superfoods that everyone is talking about. However, bone broth is not at all new; in fact, it’s been around for a very long time. Due to the numerous positive effects on health that drinking bone broth can have, you should consider making some on a daily basis. The gelatin and minerals that are drawn out of the bones during the heating process are what give the bone broth its extraordinary healing properties. At our store, you can choose from a variety of the greatest chicken bone broth. Braise de os
Gelatin is an important part of connective tissue and serves as an excellent matrix for the body’s various types of healing processes. When heat is administered, it transforms the collagen that is already present in the ligaments and tendons of the bones into a new substance. In addition to gelatin, you’ll find a wide variety of minerals that have been leached from the bones and marrow, such as calcium, magnesium, and potassium. These minerals can be found in bone broth.
What to Know in Making Bone Broth
Making bone broth is a rather straightforward process. You probably didn’t realize this, but one of the most important steps in the process of preparing bone broth is sometimes skipped over.
When determining how to prepare the bone broth, you have a few different options, each of which will give you results that are comparable to one another. However, that one key step can be the variation between results that are merely adequate and the absolute best broth that you are capable of making. Are you interested in chicken bone broth? No need to look any further! You won’t have any problems using Bone Broth.
Which Bones?
It’s true that not all of the bones in your body are made the same, and the same is true of the animals from which your bone broth will be sourced. The bones that have the most connective tissue are ideal for making bone broth because here is where the majority of the collagen is found in the animal.
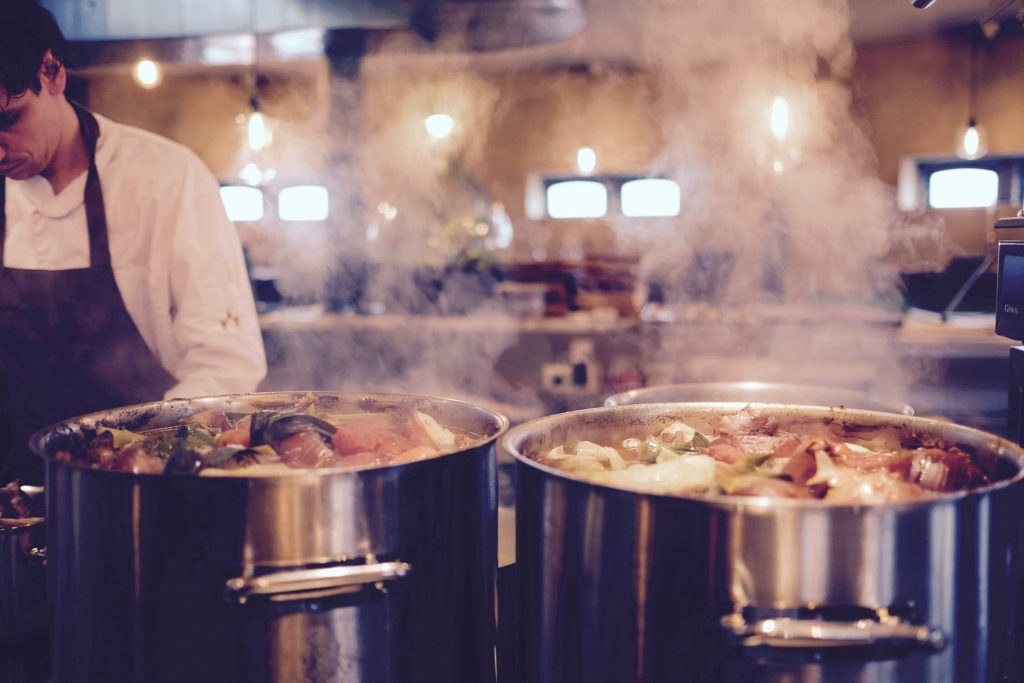
When looking for chickens, you should begin your search with chicken feet. Try looking for chicken wings or chicken backs if you’re having trouble finding chicken feet. In a perfect world, you would keep the chicken carcasses after each meal you prepared at home and freeze them in preparation for the day you would make chicken broth, but because we can’t always plan ahead, you should inquire with your butcher about the chicken feet and wings.
If you want to prepare a beef bone broth, your best option is to use a mix of beef knuckle and marrow bones. Marrow bones are rich in minerals and nutrients. If you only use the marrow bones, you probably won’t get the desired gelatinous consistency. Despite this, the collagen found in these bones does provide naturally occurring collagen as well as amino acids and has a flavor that is simply irresistible.
If you decide to go with beef, there is one more step that you might want to think about taking to improve the flavor of the finished result. Before you toss everything into the pot, set the bones on a baking sheet and roast them at 375 degrees Fahrenheit for fifteen to twenty minutes. This will help the bones develop a flavor that is fuller and more robust.
Flavourful Herbs and Veggies
If you’ve ever prepared chicken soup, you know that the first step is to prepare the broth by dicing vegetables like celery, carrots, onions, and garlic. The flavor of your broth can be greatly improved by adding just a few of these straightforward components.
If you intend to create bone broth on a regular basis, you should save aside the scraps of the vegetables that you prepare along the way because, in the end, everything will be strained out. To increase the number of nutrients present in the final product, it is important to save vegetable scraps such as the skins and ends of onions and garlic, the tops of carrots and celery, and any other vegetable scraps that may be available. Put in the broccoli stalks, the tops of the tomatoes, and any other items you think would be good to add flavor to the broth.
Bay leaves, fresh oregano, and parsley are the herbs that we nearly always incorporate into our dishes. You should wait until the very end of the cooking process to add any fresh herbs since if you don’t, both the flavor and the nutritional content of the herbs will be lost.
The Ingredient (and Step) Most People Forget
The extended cooking period is one of the most notable characteristics that set bone broth apart from typical beef or chicken stock. However, there is an additional component and essential step that brings bone broth to the next level, allowing you to extract every last drop of goodness from your bones as the broth is prepared.
This additional component is unfiltered vinegar made from apple cider (ACV). And the additional step is to wait till the fire is turned on.
Even though only a tiny amount of this sour and sweet ingredient is required for a large batch of broth (between 1 tbsp and 1/4 cup, based on the size of your pot), apple cider vinegar (ACV) plays a role in moving the breakdown of the bones in your broth. Before you even begin to cook the bones, the acidic content of the vegetables and the presence of live enzymes in the vegetables kick off the process of pulling minerals from the bones into the broth.
When you have finished placing the bones in the saucepan, throw in the apple cider vinegar and then fill the pot with ice water. After that, you will put the lid on the pot and remove it from the flame for at least half an hour. Keeping the stockpot away from the heat for thirty minutes—or even longer—protects the apple cider vinegar from having its live cultures and enzymes destroyed by the heat before they have a chance to perform their beneficial functions. After that, put in your vegetables, sprinkle them with a little bit of sea salt, turn on the stove, and let it cook.
Nutritious and Delicious
You are ready to get the broth party began as soon as you have selected your cooking technique, selected your vessel, and picked your ingredients. While you are waiting for the apple cider vinegar to absorb into the bones, roughly cut all of your vegetables.
If you opted to prepare the dish on the stovetop, when the thirty minutes are up, throw everything in the pot and raise the heat to its highest setting. As soon as it reaches a full rolling boil, reduce the heat to a low setting on the stove and keep it covered partially for at least six hours and up to twenty-four.
If you want to use the slow cooker approach, all you have to do is set your slow cooker on low for six to eight hours before you leave the house.
If you have decided to use the Instant Pot method, you should lock the lid on the pot and return in two hours.
After your broth has reached the desired level of doneness for drinking or used as a foundation for soup, you will need to filter it. We suggest preserving your broth in Mason jars with a capacity of three cups and using a sieve with a fine-mesh screen. Before storing it in the refrigerator or freezer, your broth should be allowed to reach room temperature first. You may store your broth in the refrigerator for about a week, and it will keep for months when frozen (although we bet you won’t be able to wait that long to consume it all). Bone Broth in Melbourne is home to a diverse selection of the city’s top chicken bone broth.
Because there are so many wonderful articles being shared about creating bone broth, I thought it would be interesting to share what NOT to do when preparing this healthy elixir. Bone broth is made by simmering animal bones in water. Therefore, in order to make sure that your broth always carries a powerful therapeutic punch, here are some frequent pitfalls that you should steer clear of.
You’re Doing Bone Broth Wrong if You Make These Common Mistakes
Skipping the Blanching Step
If you consider bone broth to have an unpleasant flavor, you’ve undoubtedly had a cup or bowl of it that was prepared without first blanching the ingredients. This procedure, which must be completed before roasting and boiling the bones, cleans the bones by removing any contaminants, often known as unpleasant parts. And if you use the right bones, there will be some unpleasant pieces in the finished product. A true bone broth is prepared using bones in addition to portions of meat that are rich in collagen, such as knuckles, marrow, and feet. Even though beef is the cut of meat that most people think of when they hear the term “bone broth,” this dish can also be made with lamb, pork, chicken, or veal; the possibilities are endless. A word about these thick collagen bones: they produce a stock that is viscous even when it is not chilled. Do not be alarmed by the texture of this meat Jell-O; it is an indication that you have prepared it correctly. Before roasting the bones, you must first blanch them by covering them with cold water, bringing them to a boil, and then allowing them to cook at a vigorous simmer for twenty minutes.
Not Roasting the Bones
It would be helpful if you could repeat after us, “I will always toast my bones.” This browns and caramelizes them, and we all understand that when anything is browned and caramelized, it signifies that the flavor has improved. You shouldn’t be hesitant to push the bones to their absolute limit: Andy Baraghani, a senior food editor, recommends setting the temperature of the oven to a daring 450 degrees. As another contributor to the test kitchen, Lily Freedman emphasizes the need of allowing sufficient time in the oven. A short 15 mins won’t do: Bring those bones up to the point where they are almost “too done.” When you are prepared to boil the bones, do not throw away the browned and crispy parts that have accumulated on the bottom of the pan; instead, use a metal spatula and a small amount of water to loosen them, and then add them to the stockpot. The finished broth benefits from this addition of flavor.
Cooking Too Short
It takes some time for the nutrients and minerals that are contained in the bones to be extracted and transferred into the bone broth. If you decide to stop before this happens, you won’t have the opportunity to get all you require. It throws away nutrients by putting them in the trash rather than incorporating them into the bone broth, which is a waste (sometimes called stock).
When making bone broth, you should simmer it for at least eight hours, but you should simmer it for as long as forty-eight hrs for chicken and twenty-four hrs for beef if you are using a slow cooker or heating it on the stove. In general, you are able to extract more nutrients from the bones if you cook it for a longer period of time.
You can cook the bone broth in an Instant Pot instead of a crock pot if you do not own a crock pot and do not want to leave the ingredients to simmer on the stovetop for the entire night. You may make rich bone broth in roughly two hours if you use the Instant Pot and your standard stock recipe, which both call for a cooking period of one hour. However, you must be careful not to load the Instant Pot over the line that indicates its maximum capacity.
This not only saves you time and energy, but it also keeps your house from getting too hot in the summer. When the weather is pleasant outside, I put either my slow cooker or my Instant Pot in the garage or on the back porch. Because of this, no additional heat will be introduced into the residence.
Cooking Too Long
However, the benefits of cooking have a shelf life that eventually runs out. If you leave the bone broth sitting out for too long, the flavor of the stock may change and become sour or have other unpleasant characteristics. If you leave something on the stove or in a crock pot for more than 24 to 48 hours, depending on how high the heat is, the flavor may change. This can be a problem with newer slow cookers because the heat on the low setting is typically higher than in older models.
Sometimes the color of the soup will give you a hint as to whether or not the flavor has changed. If it becomes abnormally black, you have most likely cooked it for an excessive amount of time or at an excessive temperature.
Keep an eye on it every day if you are using a “continuous brew” setup, which requires you to remove the broth each day and replace it with new bones and water. You have a responsibility to check that it is functioning normally and does not require removal. Due to the fact that the pot is left unattended for an entire night, this procedure requires extreme caution. When cooking food that needs to be done overnight, I don’t really recommend using the stove. Instead of safety, it is strongly recommended that you use a slow cooker or an instant pot.
Bone Broth Pots
When creating bone broth, the first point you will need to select is which preparation method you will employ. There are three primary approaches to cooking, and each one calls for a specific kind of pot or pan:
- Stovetop and stockpot
- Pressure cooker (Instant Pot)
- Slow cooker (Crock-Pot)
Which approach you choose to go with will be determined by the amount of time you have available as well as the quantity of broth you wish to prepare.
The following step is to select ingredients that are of high grade. When it comes to making bone broth, using high-quality components is absolutely essential, and your recipe shouldn’t be any different. You have a number of options available to you in terms of the kind of broth. The most frequent types of broth are beef broth and chicken broth, but it is also possible to prepare pork broth and even fish broth (although fish broth might not get you to the same gelatinous end product).
To make beef bone broth, you need beef bones, and to make chicken bone broth, you need chicken bones. You probably guessed that before. The key is to select the bones that are most appropriate. In addition, we advocate giving organic chicken and meat that was produced without cruelty on grass as a top priority. (Because hens and pigs are natural omnivores, we take care not to use the blanket term “grass-fed animals” when referring to these animals.) If you can’t easily get pasture-raised animals to use as a source for your broth bones, at the absolute least try to make sure they are from organically grown livestock.
When creating bone broth, it is essential to steer clear of using any aluminum. Aluminum has the potential to leach into liquids when exposed to high heat and prolonged cooking conditions; you do not want this in your stock! Both stainless steel and cast iron, in addition to enameled cast iron, are excellent options. Keep in mind that the weightier the base of the pot, the more evenly the heat will be distributed throughout the pot. If you do this while you’re cooking on the stove, you’ll prevent hot spots from giving your food a burnt or otherwise unpleasant flavor.
It is essential that you do not use a container that is too small. It’s possible that if you crowd the pot, you won’t end up with a bone broth that’s as rich as you wanted.
For me, the Instant Pot is the best tool for making the most of bone broth. When you have a lot of bones to roast, I recommend using my giant slow cooker that has an 18-quart capacity. This happens around the holidays when you have more stock to prepare than my Instant Pot can hold. Thanksgiving and Christmas are the worst. Because of this, I can cook the turkey, and numerous chickens, and stock all in the same pot without having to clean it in between uses. This saves me time and effort. This has the additional benefit of freeing up space in your oven so that you may prepare the accompanying items.
Bones to Water Ratio
To achieve that beautiful gel in your bone broth, you’re going to need a lot of bones. This is where the significant misunderstanding regarding the high cost of the bone broth comes into play.
Making bone broth requires a surprising number of bones, which drives up the cost of the ingredient. This is the reason why bone broth is not cheap these days, despite the fact that we are working to remedy this.
To get a bone broth with the right consistency, how many bones do you need to use? Imagine that the bone-filled pot you have is a cup, and the bones are the ice. When you add water to the ice, it expands and fills up all of the spaces that were before empty. In this scenario, the bones that you use are the ice itself.
We recommend using a ratio of 1.4 bones to every 2 cups of water when making chicken bone broth. If you can get your hands on some chicken feet to add to your collection of chicken bones, then the proportion of bones to water will be closer to 1:2. (ex: 1 KG of bones per 2L of water).
Although the proportion of bones to water in beef (or other ruminants) bone broth is typically closer to 1:2, the type of beef bones you use has a significant impact on the outcome of the broth.
Because the results you get will be variable based on the bones you use, it is recommended to practice with a smaller quantity first before attempting to test a bigger one. There is nothing more disappointing than reaching the end of a long-simmering process only to discover that the bone broth you made was only average.
Bone Broth Gel
If you simmer your broth for a long time in order to get all of the nutrients from the bone, you shouldn’t be startled if it doesn’t gel. Gelling is fantastic, but you shouldn’t be surprised if the bone broth doesn’t gel. As a result of the lengthy boiling process, the gelatin has degraded.
Even if it has been broken down into smaller pieces, it can still be absorbed by the body. If you are truly concerned, you may want to consider including some high-quality gelatin that you have purchased from a store. Alternatively, you may throw in some chicken feet during the final several hours of the cooking process. Even if you are preparing bone broth from beef or pork, this will give it a gel-like consistency. Bone broth is delicious regardless of whether or not it has been gelled.
Adding Too Much “Stuff”
According to Baraghani, all you really need for a tasty bone broth is some bones and a few select aromatics, such as onions, garlic, and black pepper. A decent bone broth doesn’t require much else. He continues, “Don’t even get me started on carrots,” which are an ingredient that contributes sweetness. (However, we won’t deduct points if you wish to add them; a touch of sweetness can help to balance the intensely savory character of bone broth.) However, you should not bring all of your compost scraps here because it is not the best spot to do so. Maintain the intensity and concentration of the flavor, and are you concerned that it would taste “one-note”? Roasting the bones adds a layer of complexity to the flavor, so you won’t have to worry about that.
Using Fat Incorrectly
Using fat that has been heated for an extended period of time poses a risk since the fat may become rancid. If you want to retrieve the fat, you will need to use a ladle to skim the fat once it has liquified (which should take about an hour or two), and then place it in the refrigerator so that it can solidify. If you forget to add fat and then discover it after the food has been cooked, you should get rid of it before you use it.
This strategy includes both positives and negatives. It’s great that you’re able to make use of and claim the fat. On the other hand, having a good, thick layer of fat on top of the bone broth helps it to keep for a longer period of time in the refrigerator. Therefore, as a means of making amends, you should plan on rapidly depleting your stock. You could also put it in the freezer for long-term storage so that you don’t run the risk of missing the expiration date and having it go to waste.
You should also add the fatty trimmings from birds as well as the chicken skin; doing so will increase the amount of fat that is contained in the stock. I could use some of it for cooking and save the rest so that the bone broth would have a protective layer of fat on top of it. Both options were available to me.
In any event, if you want your stock to have the longest shelf life possible, you should always keep it in the coldest region of your refrigerator. Make sure you utilize the bone broth within three days, or you can freeze it for later use.
Too much foam
Sometimes the presence of foam is an indication that contaminants are being released from the bones as they are being cooked. During the cooking process, you should remove this foam from the soup. When making bone broth, many people discover that using organic bones from grass-fed animals results in very little to no froth.
A warm broth can be an ideal environment for the growth of microorganisms. Not the beneficial bacteria that help keep the gut healthy, but the harmful bacteria that really can make you sick.
Bone broth is great when consumed on its own, but it may also be included in a variety of other meals, including those that use meat, fish, and vegetables. Be very careful when you filter your bone broth to remove the bones and make sure there are none left behind. Moreover, before placing the broth in the fridge or freezer, give it some time to cool down. Check out our chicken bone broth made from Melbourne chickens here.